@Rocky_Stone Hi. From what I see, you need to enlarge the camera size.
Pencil2D is a bit different than most drawing software. In other apps the canvas is always representing the size of the drawing surface. Whereas in Pencil2D what you see is represented by the size of the camera
Basically whatever the camera sees is how the final video will look in terms of movie size.
Double click the camera layer name > a dialog will appear to allow you to change the Width & Height of the viewfinder according to your current image. to view all of it once you export.
To learn more on how the Camera works please visit the following guide:
[Optional] Resizing Image Contents
However if you want to resize the actual contents as well, currently Pencil2D does not have this capability, so the only workaround I could offer once you need that is to export a PNG sequence and re-import it into Krita, which is a free image manipulation software that allows for sequence layers.
If you need to resize multiple frames on a layer, upscale without losing quality, use masks, and all that better try Krita instead.
Krita doesn’t have a camera, it’s more like photoshop or GIMP where you have the canvas only. Basically it’s something like this:
- Export a sequence of images (PNG) from Pencil2D. If you want them to have transparent background you can check a box in the export dialog.
- Open Krita (download it at krita.org)
- Go to File > New > Custom Document > Dimensions Tab > Width & Height > And remember that the new document needs to have the same canvas size as your current images. If you’re unsure of the size double click your camera layer in Pencil2D to know the size of the camera, which will also be the size of your final images.
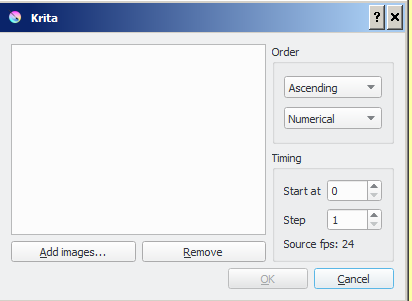
- Go to File > Import animation frames This dialog will appear.
- Make sure in the
Timingsection you specify the Start at 1. Step is left as 1. - Import those images into Krita by using File > Import Animation Frames
- Click on the [Add images…] button > Browse your computer folders and select all the images you exported from Pencil2D.
- Press Ok and it will take some seconds to minutes to import the frames into a sequence layer.
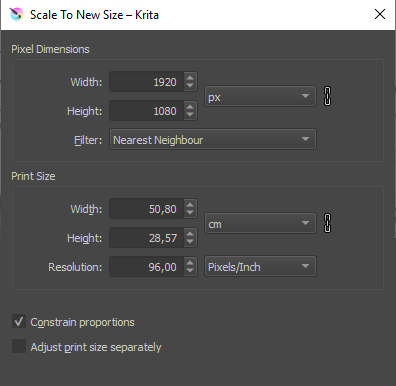
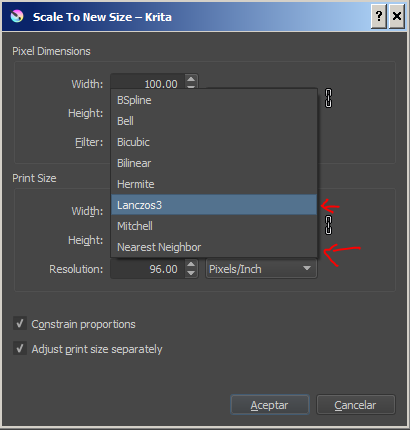
- Once imported you’re going to enlarge the whole canvas along with the contents, this will affect all the frames. To do this go to Image > Scale Image to New Size… select the Filter dropdown box and pick the Lanczos3 filter.
- Once you do, in the Pixel Dimensions section set the Width and Height to modify the resolution to the final size you want.
- [Optional] This video also shows how to resize a canvas in krita in under a minute
- Once you have resized the contents of the layer, you will need to re-export all the frames / drawings as an image sequence again. Go to File > Render Animation > Select the Image sequence option. Though It should come selected by default if it’s your first time using this feature as video needs additional plugins.
- Select the file format as PNG
- Browse for an output location, but make sure it’s an empty folder, otherwise it will wipe whatever is inside and set the
start numberingto 1. - With this you can then re-import the images into a new Pencil2D project by going to File > Import > Image Sequence
Afterwards you can continue working with Pencil2D if you like.