Newbie question--want to make a specific animation

Hi everyone,

I’m a total newbie to this program and to animation software. We want to make a short animation, about 5 to 10 seconds long, for my wife’s musical theatre company. It’s for the musical Newsies. We have an image of a chalkboard with stuff written on it already. And we want to add an animation of someone writing the word “STRIKE” overtop of that image in real-time, and have it play back in real-time.

I did try it once, but a couple of things didn’t work. Firstly, when I imported the image, it didn’t appear in the same colours as the original image. On the original message, the top line of writing is in white, while the rest of the writing is also white but in a slightly smaller font. It might be that the top line was also set to bold, while the rest was normal. After importing it, the image appears different, with the writing in the centre of it (like a central square) in white, with the rest of the writing in grey. I don’t know if there’s a way to fix that in Pencil 2D. I suppose we could modify the original image so that all the writing is the same colour and/or it’s all normal, as opposed to part of it being bold.

I then wrote the word “Strike” on top of the image. But when I played the animation, it played it in a fraction of the time it took me to write, which is not what I want. I want the animation to basically record the writing of the word and play it back as if someone was writing it. But I’m not familiar with animation software at all.

Could someone tell me how to do the animation part?

Thanks!

Peter

@Hi Peter. Welcome to the forum. I’ll try to be as succinct as possible but your design problem has to be solved in different fronts and Pencil2D can only cover some of them.

From what you’re describing I gather that you require an animation to reveal the word “strike” as if a hand graphic was writing that word.

To do this, only with pencil 2D, you’d need to animate the reveal “backwards”, that is from the last frame of your animation, showing the entire word, erase parts of the letters from right to left until you reach the first frame where the word is completely erased.

As this might require too much time I can also recommend using a complementary program like Synfig where you can use “masks” to automate the animation and avoid damaging your text graphic. The word is revealed by using the transparency channel of the “mask” layer, when achieveing the effect you want you can export the result back to Pencil2D and then “composite” (technical term for overlaying graphics) the animated word on a different layer over your chalboard background.

The hand animation in Pencil2D would need to be made frame by frame, however it can be made more efficiently with Synfig since you can setup keyframes and let the computer figure out where it should interpolate the motion so you’d only have to setup the “key” drawings or “positions” for the hand to they match with the word reveal.

Forgive me If i may be misunderstanding you also mention that there is a text misalignment. since Pencil2D does not currently support fonts I take you’ve imported the background and the text (as a bitmap image) separately. Pencil2D only keeps track of absolute pixel positions for the graphics. So unless the text was exported as an image with the same size of the chalkboard or original image document, but with a transparent background, then it will not align properly. For that there are two possible solutions:

  1. From your graphics program export all the image layered elements (i.e text, chalkboard, hand, etc) as PNG files with the size of the graphic document (e.g 1280 x 720) and make sure your Operating System shows that these transparent images have that size.
  2. The other option is to export a reference image with the exact layout you want, and then reorganize the layered elements to match the reference in Pencil2D using the selection (marquee box) and move (black arrow) tools.

Synfig also has text capabilities so possibly that software can also help you fulfill your requirements if you need to change the font (assuming you’re using a system font).

Regarding the problem with the imported image not appearing the same color is indeed an odd case, but this could probably be caused by a mismatch of color spaces; this is a common occurrence with all graphics software.

If your original image was, perhaps, meant to be printed it currently could have a CMYK color space, but Pencil2D should only recognize sRGB images. The translation between these two color spaces could be the reason why your image colors are looking different, but the only way to fix this is that the person that made the original image and has the source files, converts the image to a “screen” color space (sRGB) rather than a “print” color space (CMYK)

It’s also possible that the image color spaces are not different but we might need to see a set of screenshots that showcase how you expect the image to look and how it looks in Pencil2D to be able to help further in that regard.
@71bruins Hello. @JoseMoreno covered the techniques for making the animation pretty well. If you want to do it in Pencil2D: start with your full image at the end, copy it to a previous frame and erase a little bit off the right side, and keep doing this until everything’s erased and you’re at the beginning of the animation.

As another alternative, there are many commercial “video scribing” or “whiteboard animation” programs which would get the job done quickly, but may be overkill for just one word. Example: https://www.videoscribe.co/en/. I have not tried any of these programs, but the results of that one look pretty decent.

Back you your initial problem, I don’t think that you are having a color space issue, it could be something much simpler. When you create a new project, you will see that it starts off with a white square and a gray area all around it. The white square represents what is visible to your camera (and thus is the area that gets output during export). If your chalkboard picture is larger than this area, then the gray outer bounds will make the outer parts of your image darker, and they will get cropped off during the export. Presumably this is not what you want, so you can change the camera area by double clicking on the camera layer near the bottom right of the window, and a dialog will come up that allows you to set the pixel dimensions of the camera to exactly the same as the chalkboard image. Then don’t forget to switch back to a bitmap layer or you won’t be able to draw.

Pencil2D does not render text, or change the image in any way when importing (the gray area is drawn over top), so any issues with the text not appearing in bold or whatever is an issue with the program you are creating the image with.

Thank you Jose and Scribblemaniac.

That tip about making the pixel dimensions of the camera to match the chalkboard image works, thanks for that! When I import the image now, it looks like it’s supposed to look.

The process of starting at the end of the animation and working backwards sounds like it’s too over my head.

I was talking to my son-in-law just now about this and he suggested exporting the animation as a movie and bringing it into a video editor and slowing it down to the speed that I want, which is the normal pace of writing. I tried to do that just now. I clicked on Export, Movie. In the Export Movie dialog, Camera Layer is the only thing available in that drop-down list. It exports to an MP4 file but when it tries to play it in the Windows media player, it says “This file isn’t playable. That might be because the file type is unsupported, the file extension is incorrect, or the file is corrupt.” I noticed that in File Explorer, the MP4 files shows 0 bytes for the size, so something obviously isn’t right.

Thanks.
Peter

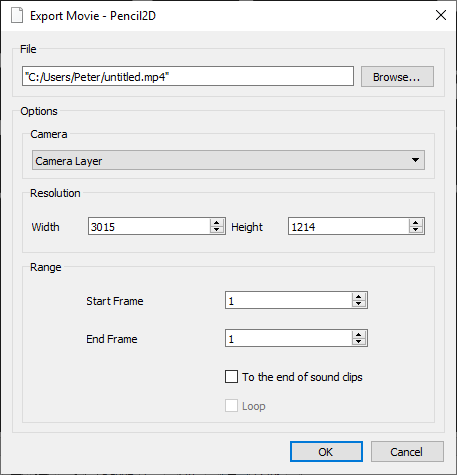
@71bruins That’s a good idea. Using a video editor. Regarding the export issue, can you show a screenshot of the export settings dialog? Also, which version of Pencil2D are you currently using? The current version should be capable of exporting without issue, but if you keep having the same problem I can direct you to a development version you can try to rule out that the problem is the software itself.

I’ve pasted the image below. I’m using version 0.6.2

I just thought of something. Should I be changing the Start Frame and End Frame numbers?

image

@71bruins Hi. Well the End Frame marks the last keyframe or drawing that your video has. It is automayically populated if you have a drawing on any frame other than 1.

If you are not animating anything In Pencil2D, then I would personally recommend to import the drawings in the video editor directly as images and give them enough “stage time” in the video editor itself. No need to export a video from Pencil2D if there’s no animation involved.

If you do have an animation in Pencil2D, make sure you have created enough keyframes along the timeline so the End Frame field is automatically populated. This field fills in the last existing keyframe on the timeline.

If you need a free video editor here’s a short list of recommendations: